
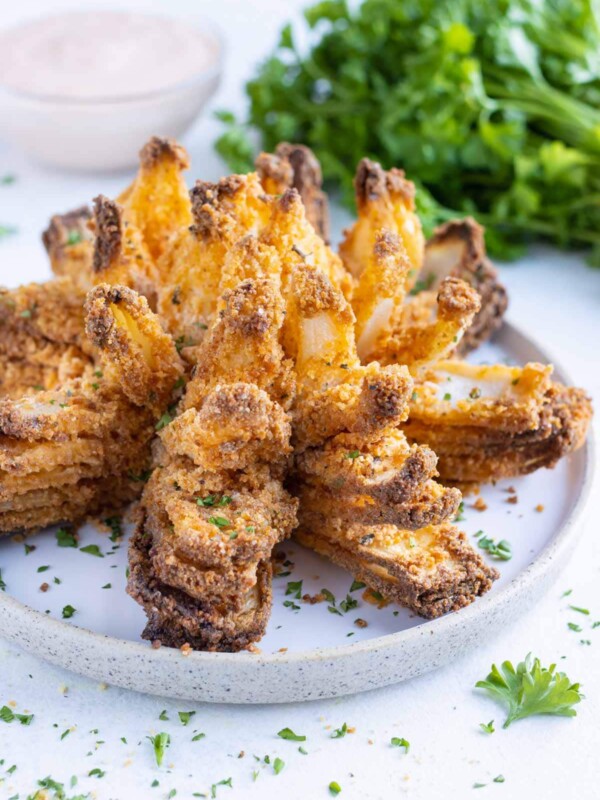
Outback Steakhouse is known for, of course, their steaks, but maybe even more so for their famous appetizer…
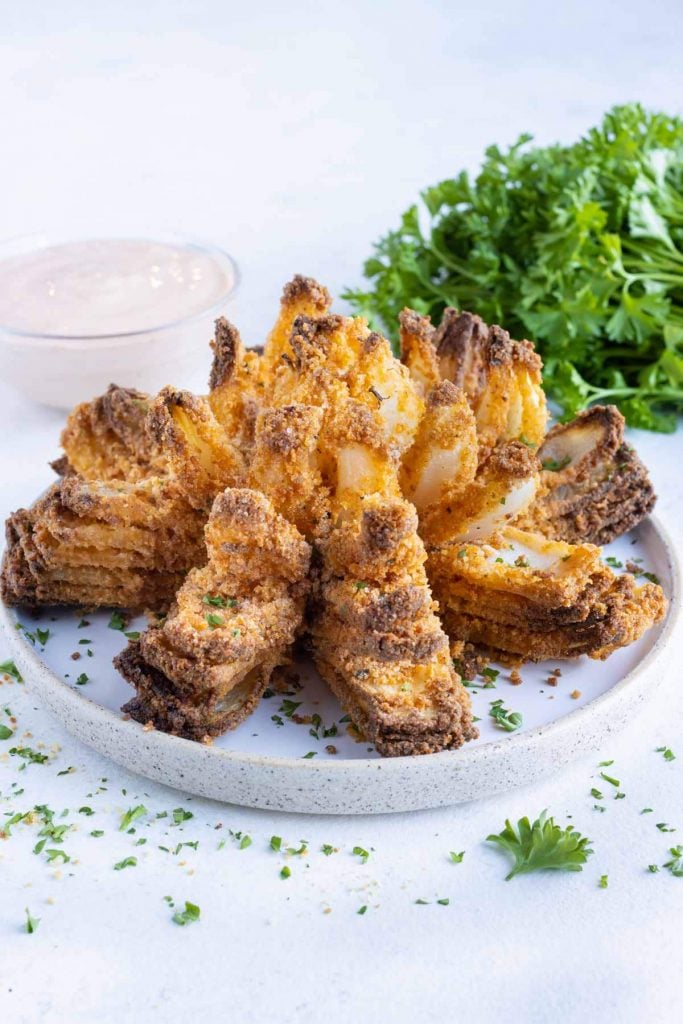
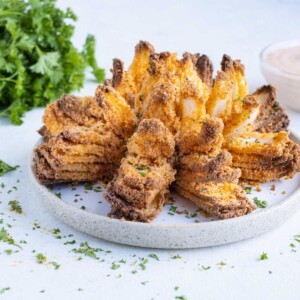
the Blooming Onion.
A gorgeous display of onion petals that are deep-fried to golden perfection and then served with a zesty dipping sauce.
Delicious, yes. Healthy, not at all.
So when I recently got the inkling to make this dish at home, I knew I would have to make it quite a bit healthier.
And the first thing that came to mind – pop it in the Air Fryer, of course!!
However, making this one simple switch was no easy feat. There were a few roadblocks that came up throughout the process:
- How to cut a Blooming Onion – pretty easy, but there are a few nuances I’ll be sure to address below.
- The best breading to use – while some use simply flour, a mix of breadcrumbs AND flour actually does the trick!
- How to coat the onion – this might have been the trickiest part of all. Five attempts later, I finally cracked the coating code!
- And of course, that incredible Blooming Onion Sauce! Which we nailed after a few rounds.
So after MUCH recipe testing and tweaking, looking at various air fryer and non-air fryer recipes across the web, I’ve finally come up with THE BEST Air Fryer Blooming Onion recipe that you’ll find below!
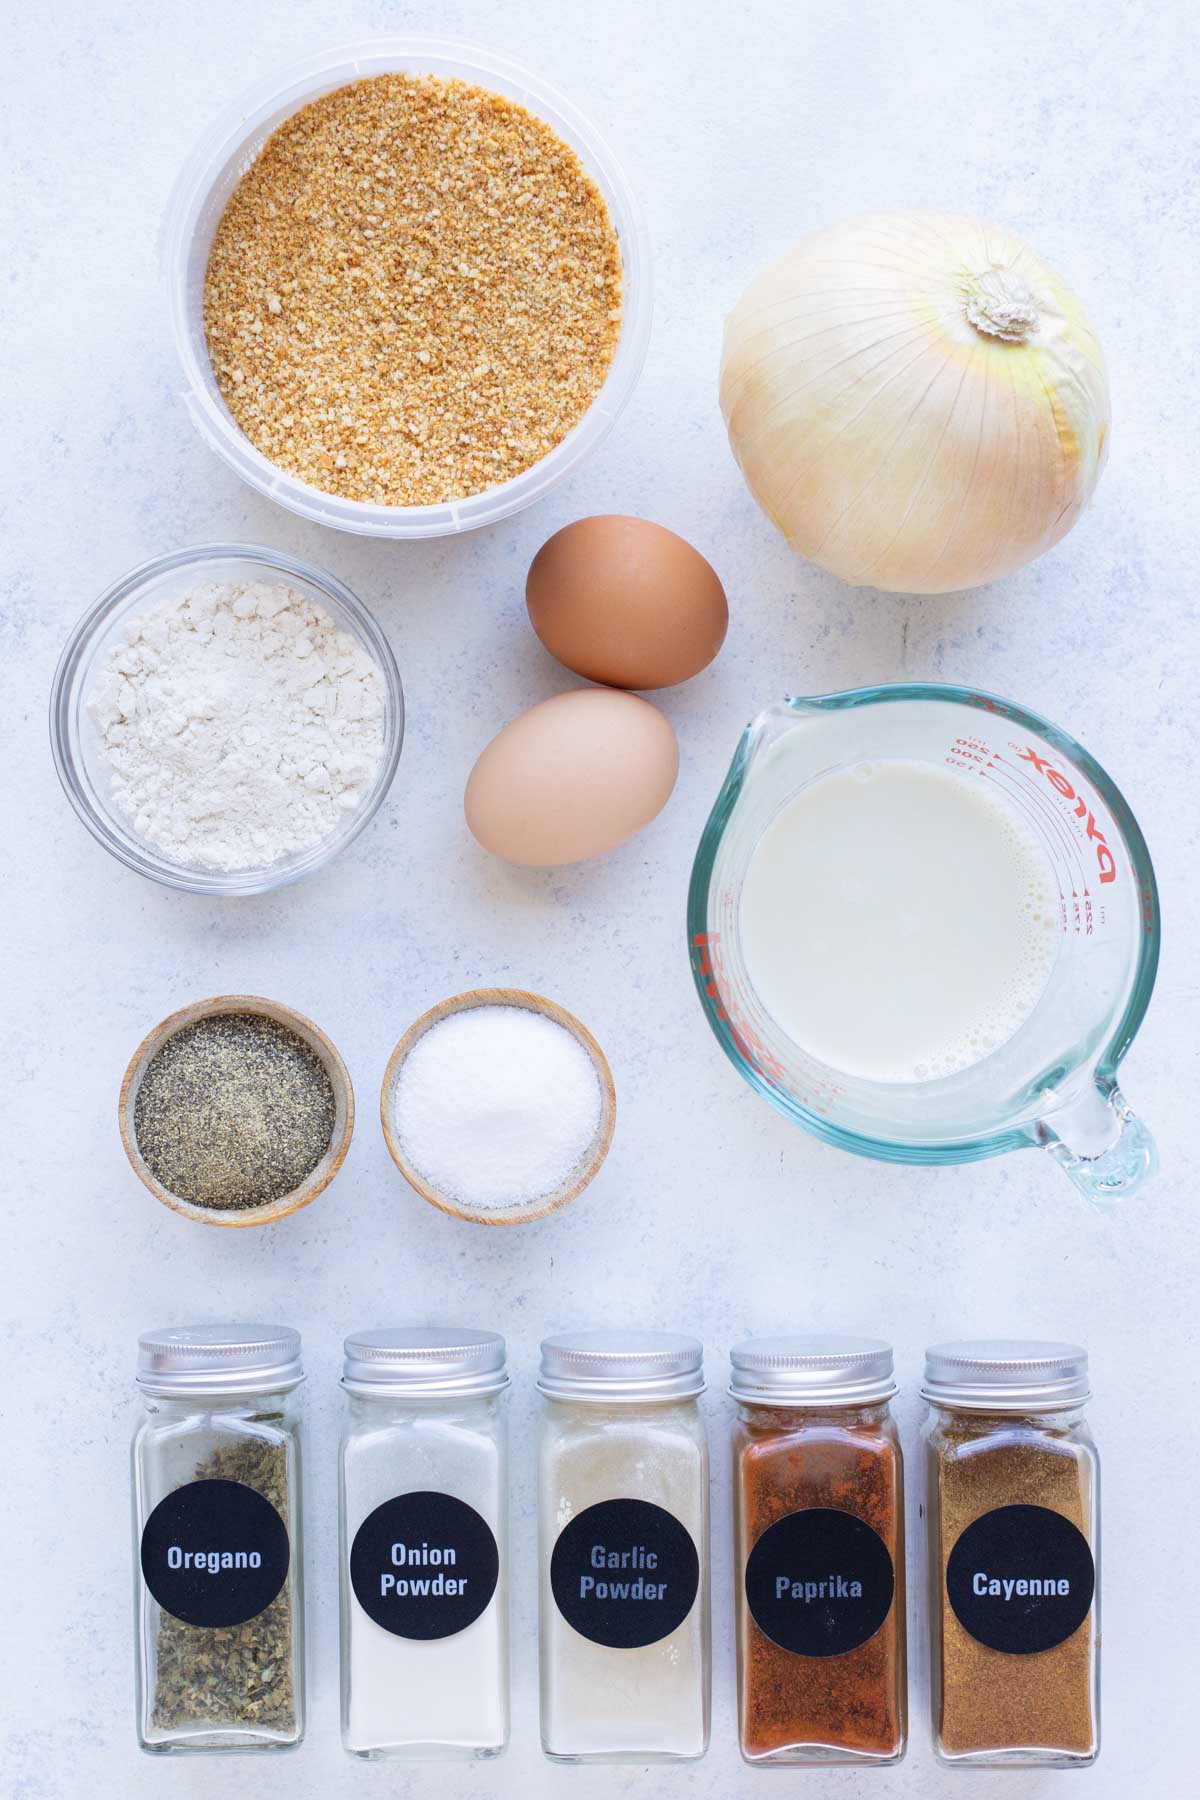
Ingredients
The simple ingredients you need to make this Blooming Onion recipe include:
- Onion. Choose between sweet, yellow, white, or vidalia onion. The sweet onion is the least pungent compared to yellow and white. Medium-sized is best, too large or too small will result in having either too much or too little breadcrumbs.
- Eggs. Two large eggs are mixed with milk to get the coating to stick. Vegan alternatives have not been tested in this recipe, so use with caution.
- Milk. This works with the eggs to create the binder, so full-fat is best. Regular, buttermilk, or plant-based are all good options. Oat milk was tested in this recipe.
- Breadcrumbs. Select regular, un-seasoned crumbs for the coating. The finer the better since coarse crumbs, such as Panko breadcrumbs, won’t stick as well. Go the extra mile and process the crumbs to be even finer so they will stick better.
- Flour. Either all purpose flour or a gluten-free 1-to-1 blend may be used.
- Seasonings. Paprika, dried oregano, cayenne pepper, salt, black pepper, garlic powder, and onion powder (don’t sub one for the other) flavor the breadcrumbs and dip.
- Non-stick cooking spray. This is an absolute must-have. Pick either original, avocado oil, or butter flavored.
How to Cut a Blooming Onion
The basic steps for making a Blooming Onion are simple to follow. Please see the recipe card below for more detailed ingredient amounts.
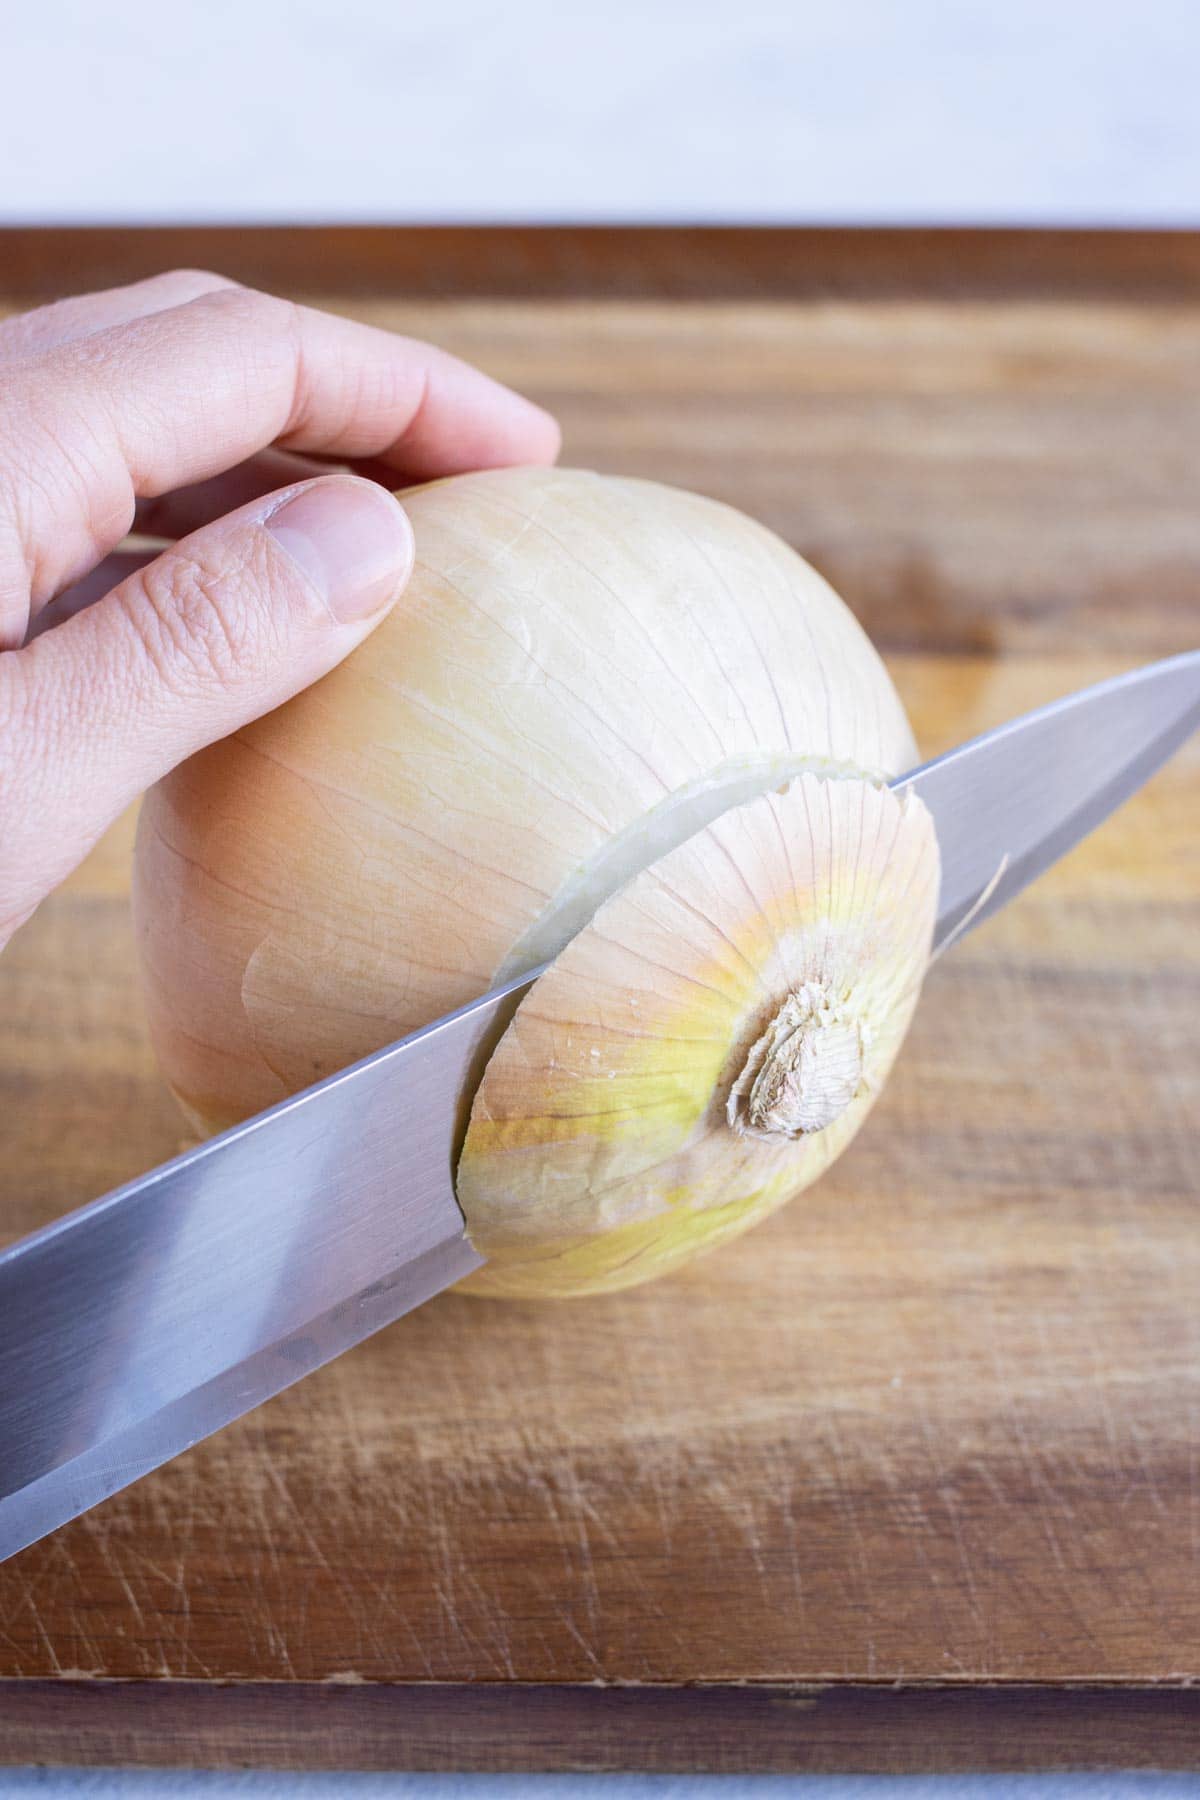
Trim and Peel
Find the end of the onion with the brown feathery pieces, this is the root end. Remove the opposite end, the stem, by slicing off ½-1 inch.
Completely peel off the paper thin skin. This outer layer will be chewy if left on so you want to make sure and remove all of it.

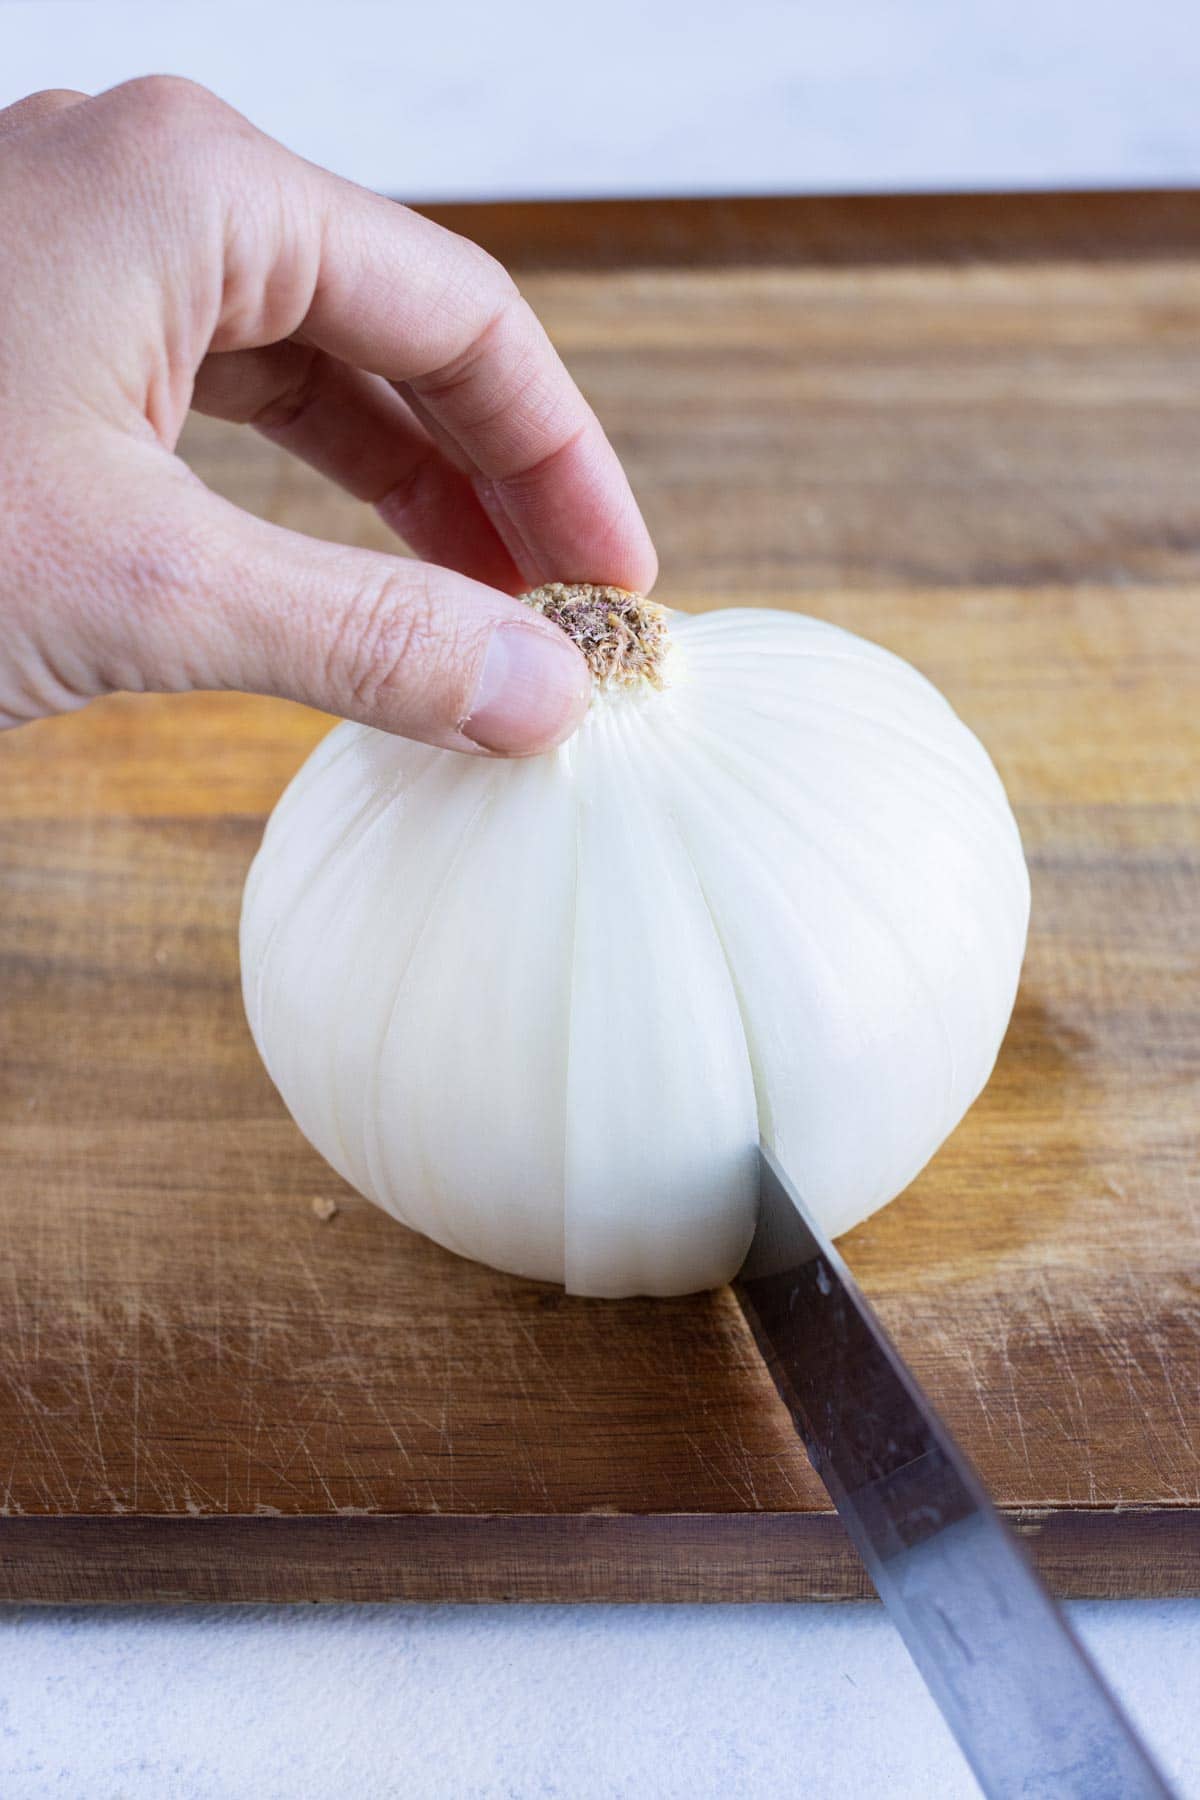
Cut off the root end. Peel the outer layer.
Cut the Petals
Set the onion flat-side down on a cutting board. Starting about ½-inch from the root end of the onion, make a cut. Do not accidentally slice the onion in half by cutting too close to the root. Slice all of the way into the middle of the onion so all of the cuts connect.
Cut the onion into quarters by making three more evenly-spaced slices. In-between each of the slices, make 1-2 additional cuts to get 8-12 sections.
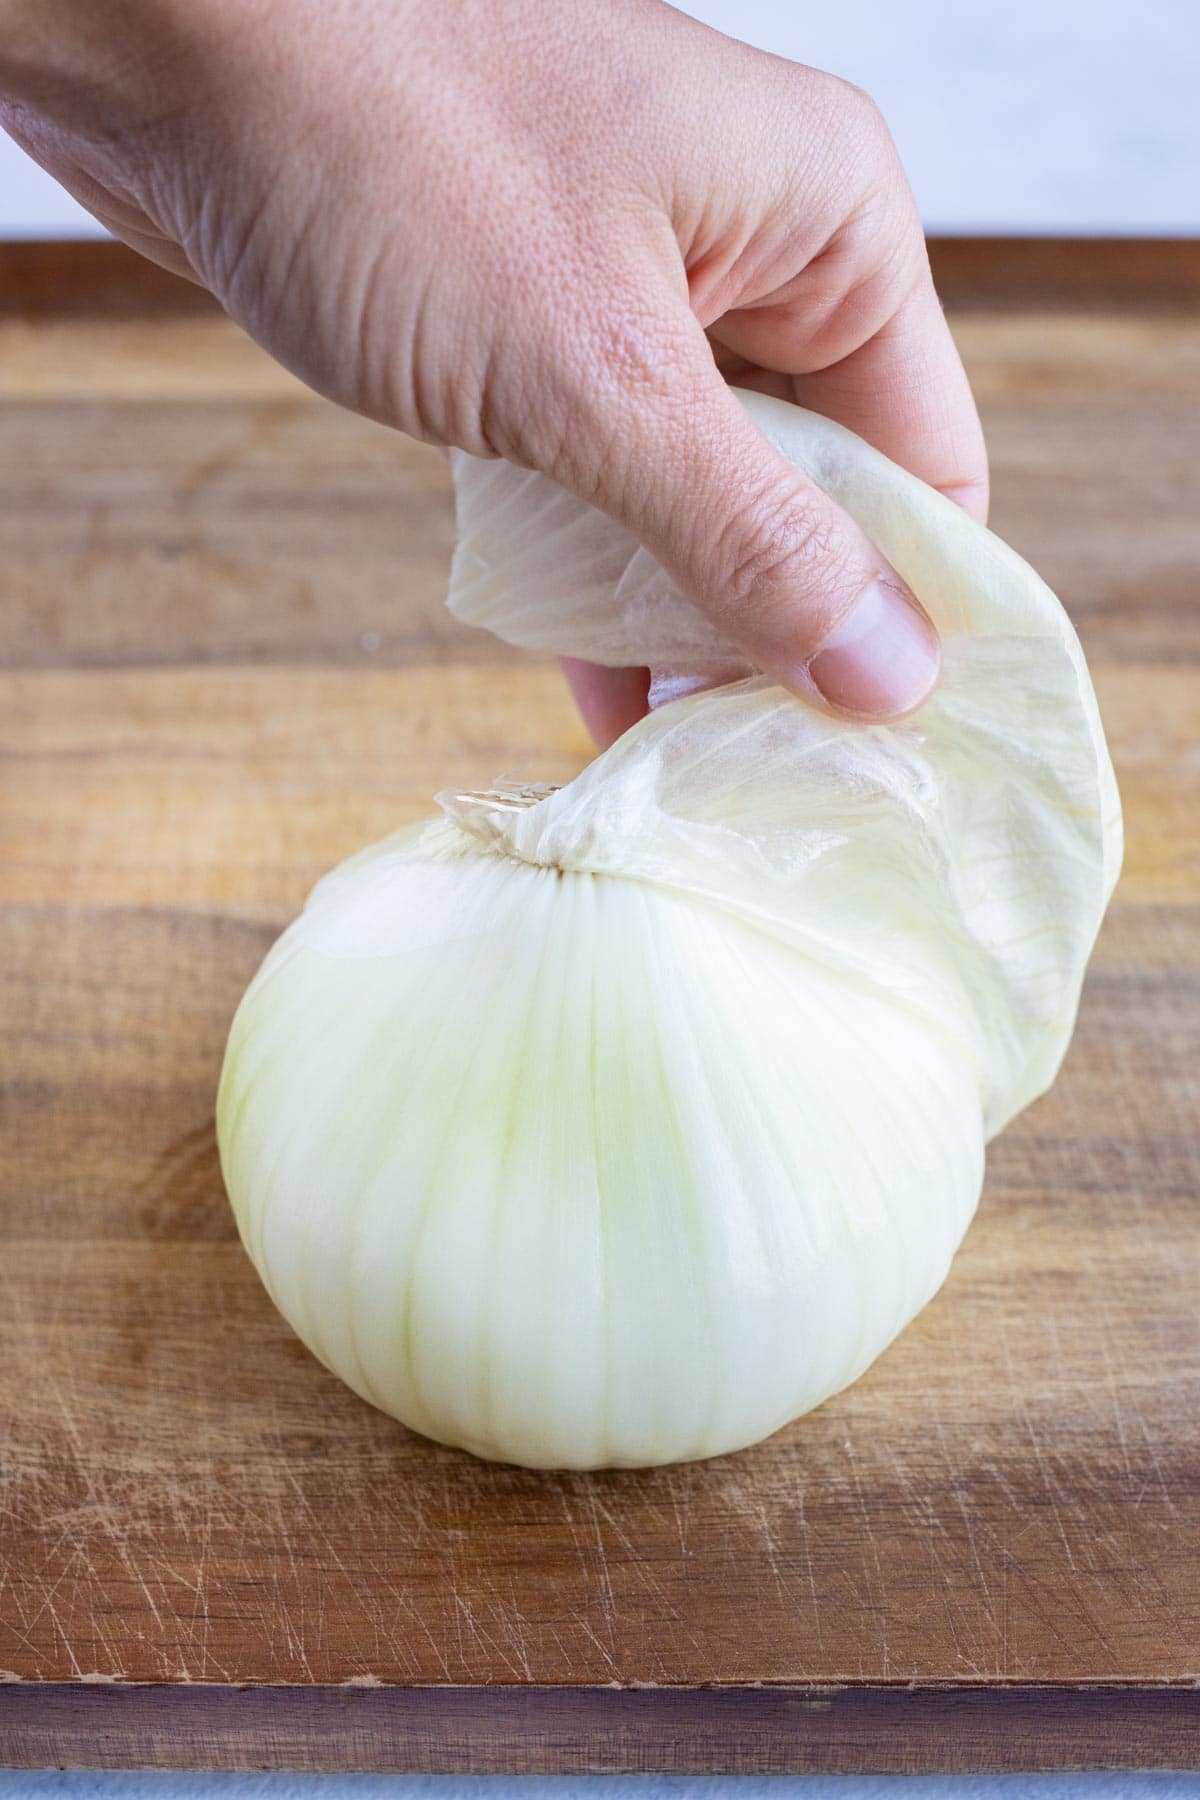
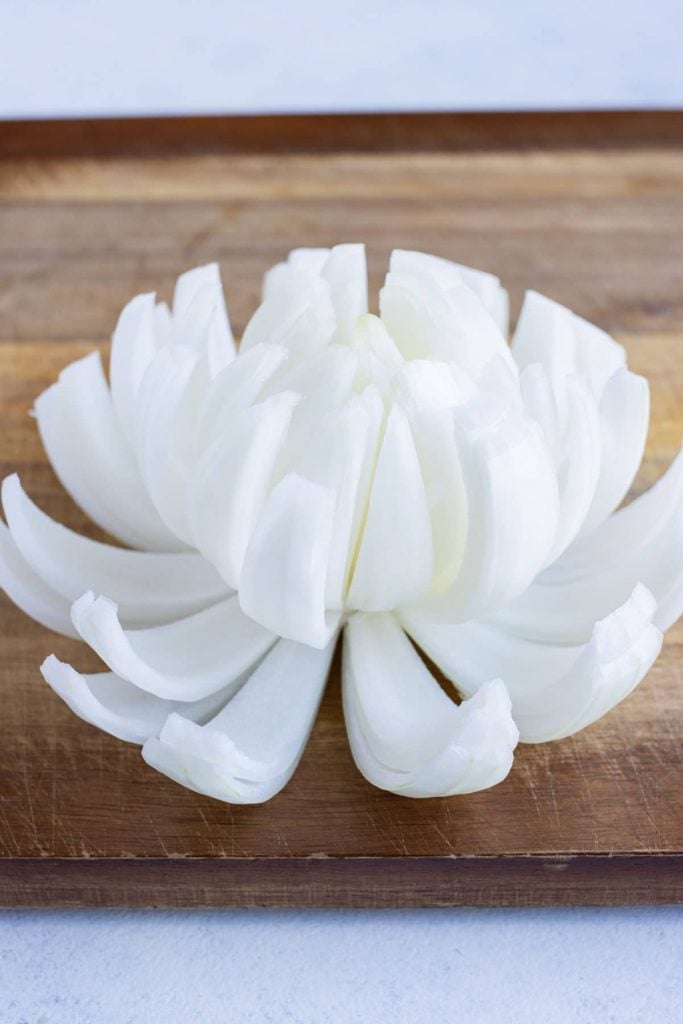
Flip the onion over and allow it to sit for 5 minutes so the pieces can naturally open up.
Lay onion flat and slice petals. 
Let rest so the onion naturally opens up.
How to Air Fry a Blooming Onion
Coat in Egg Wash
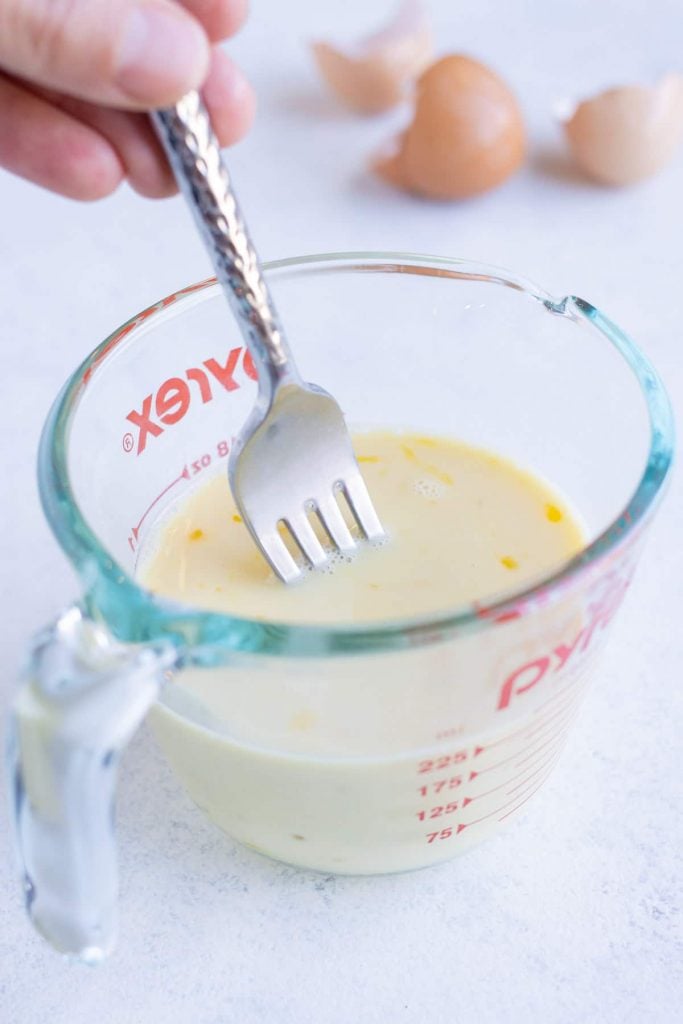
Combine the eggs and milk with a whisk. Doing this in a measuring cup with a spout makes it easier to pour and get into all of the nooks and crannies.
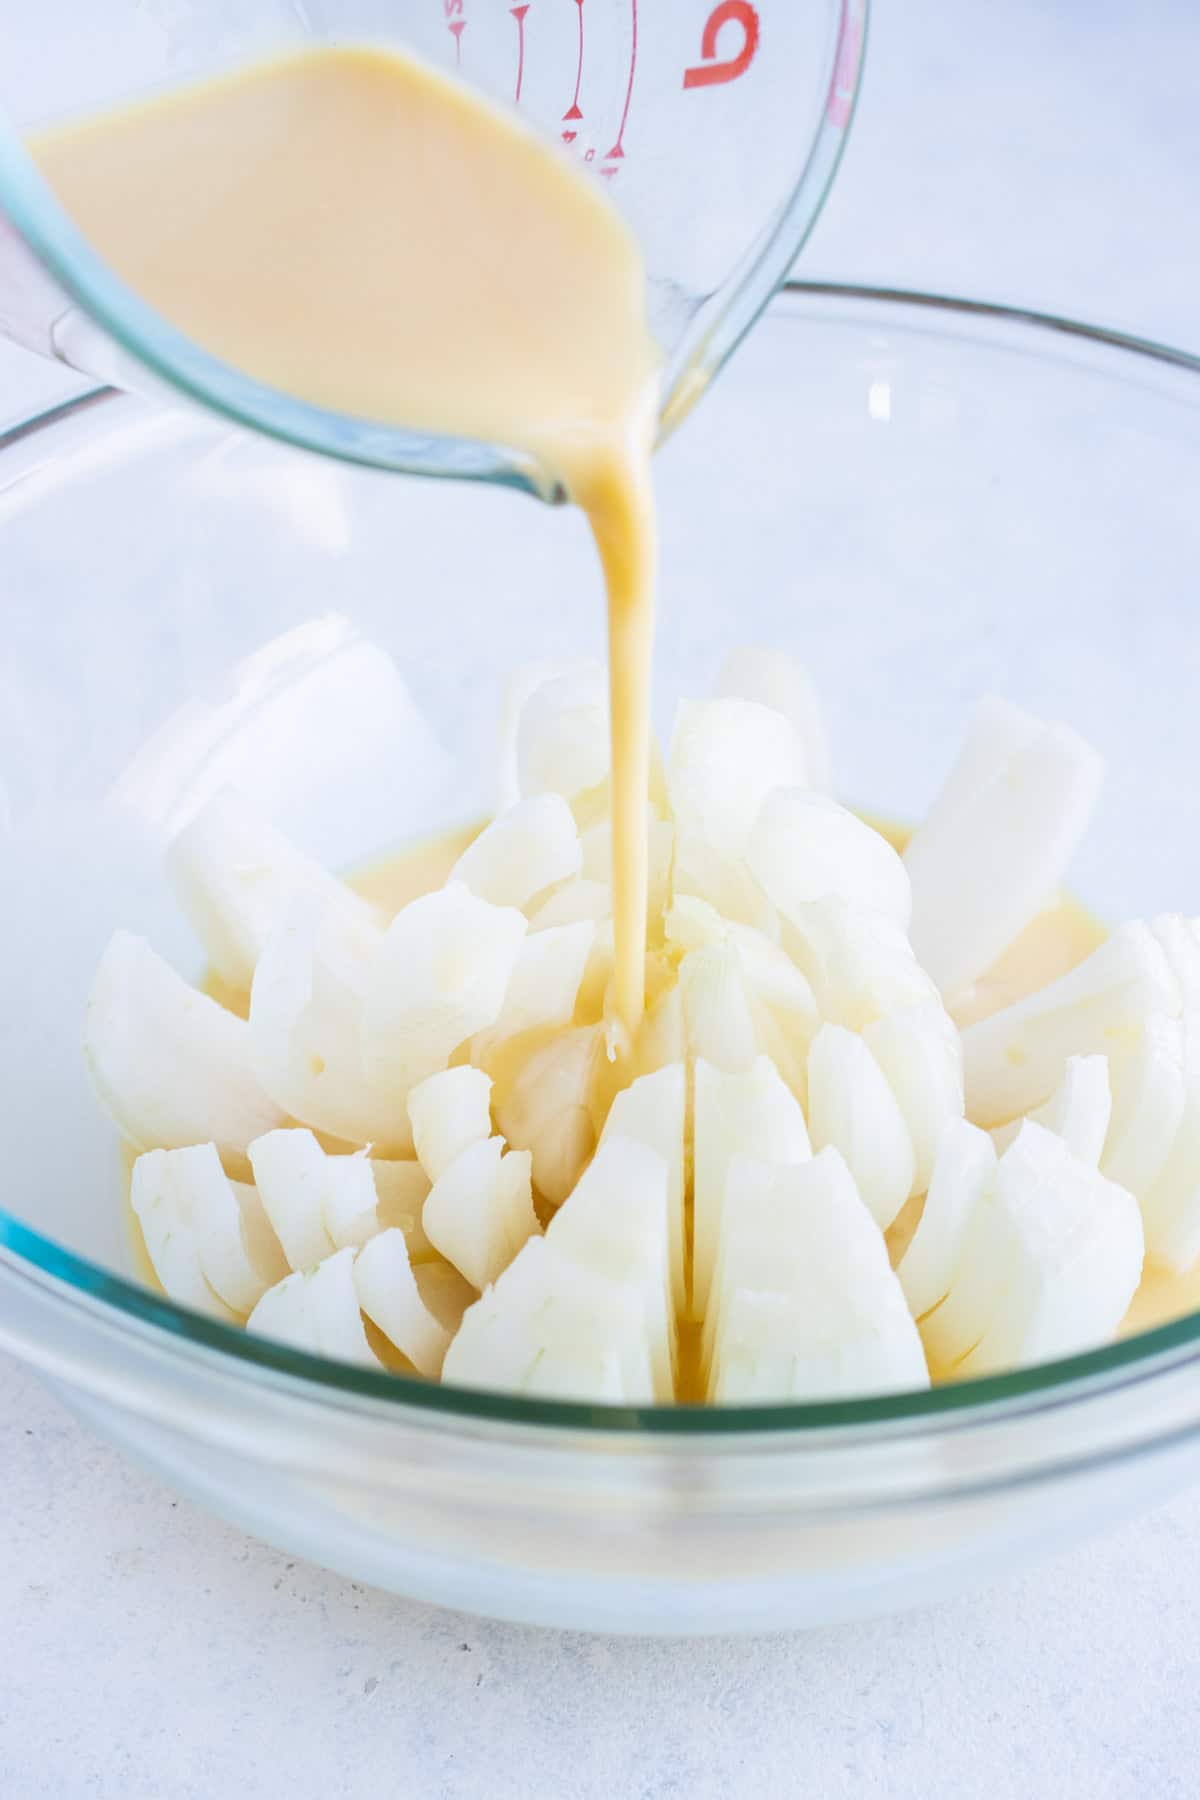
In a large bowl, pour the egg and milk mixture over the cut onion. Separate the slices as you do this so the egg mixture gets in-between all of the layers. Use a slotted spoon or fork to remove the onion and let any excess egg mixture drain off.
Transfer the coated onion to a new large bowl with the cut side facing up.
Whisk the eggs and milk. Pour over onion.
Cover in Crumbs
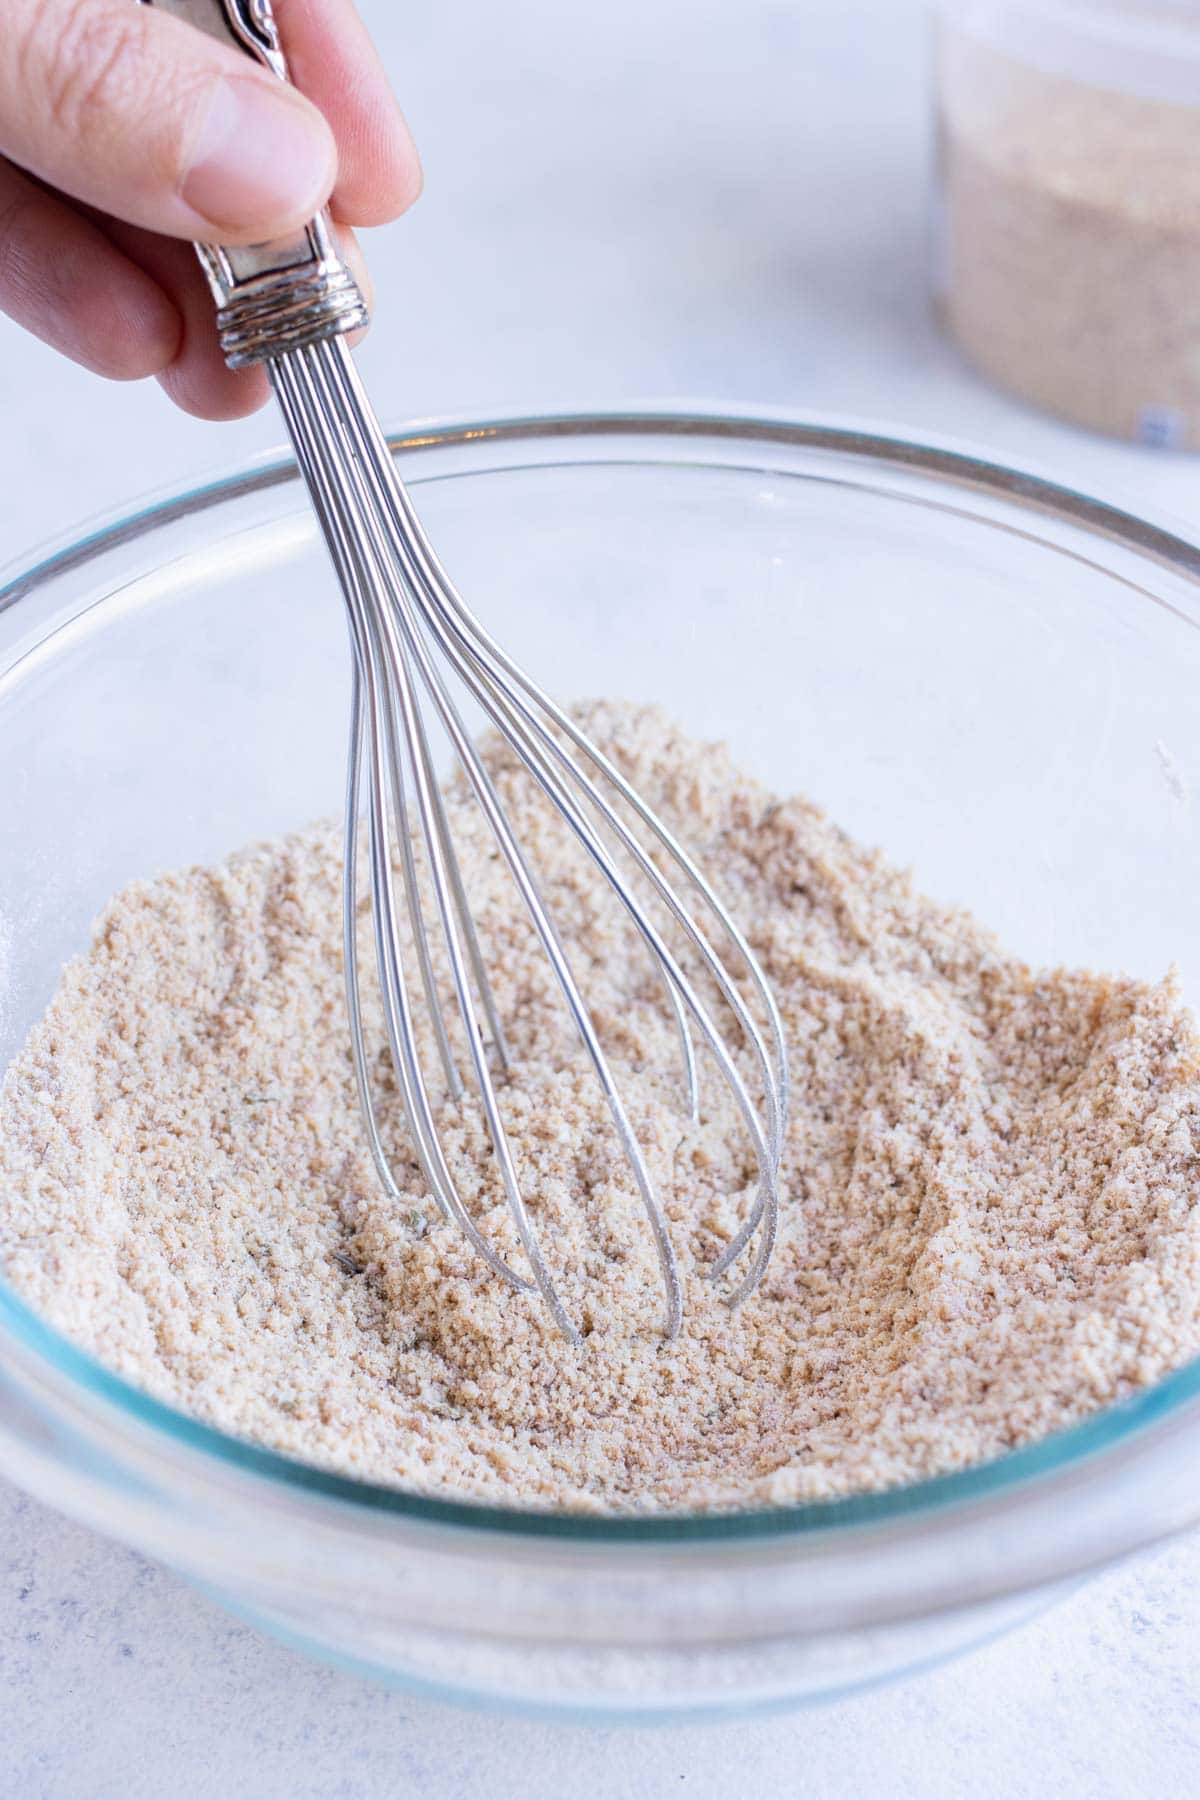
Mix the breadcrumbs, flour, garlic powder, onion powder, paprika, oregano, cayenne pepper, salt, and black pepper together in a medium-sized bowl.
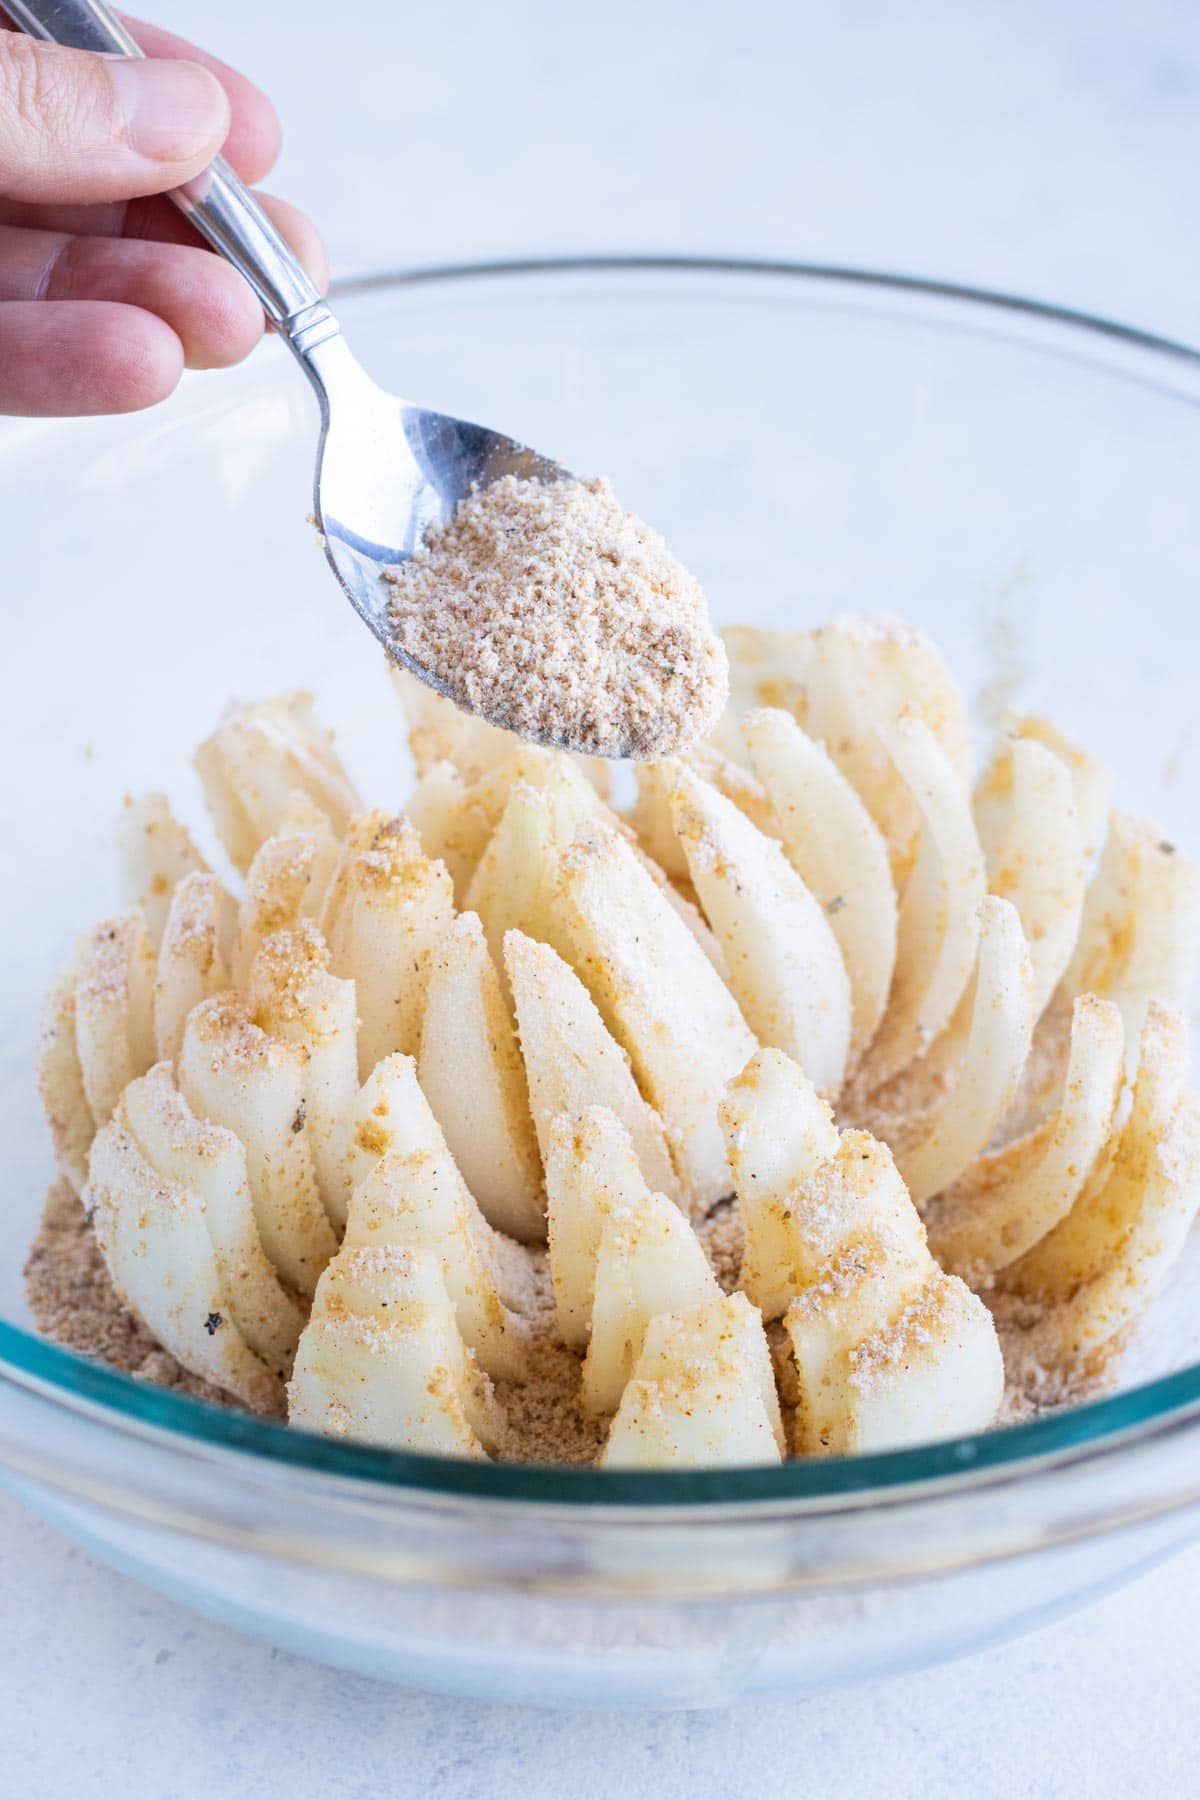
Use a spoon to sprinkle the seasoned breadcrumbs all over the cut onion. Once again make sure to spread the layers apart to get in-between the slices as well as on the exterior of the onion.
Shake off any excess flour and breadcrumb coating from the onion.
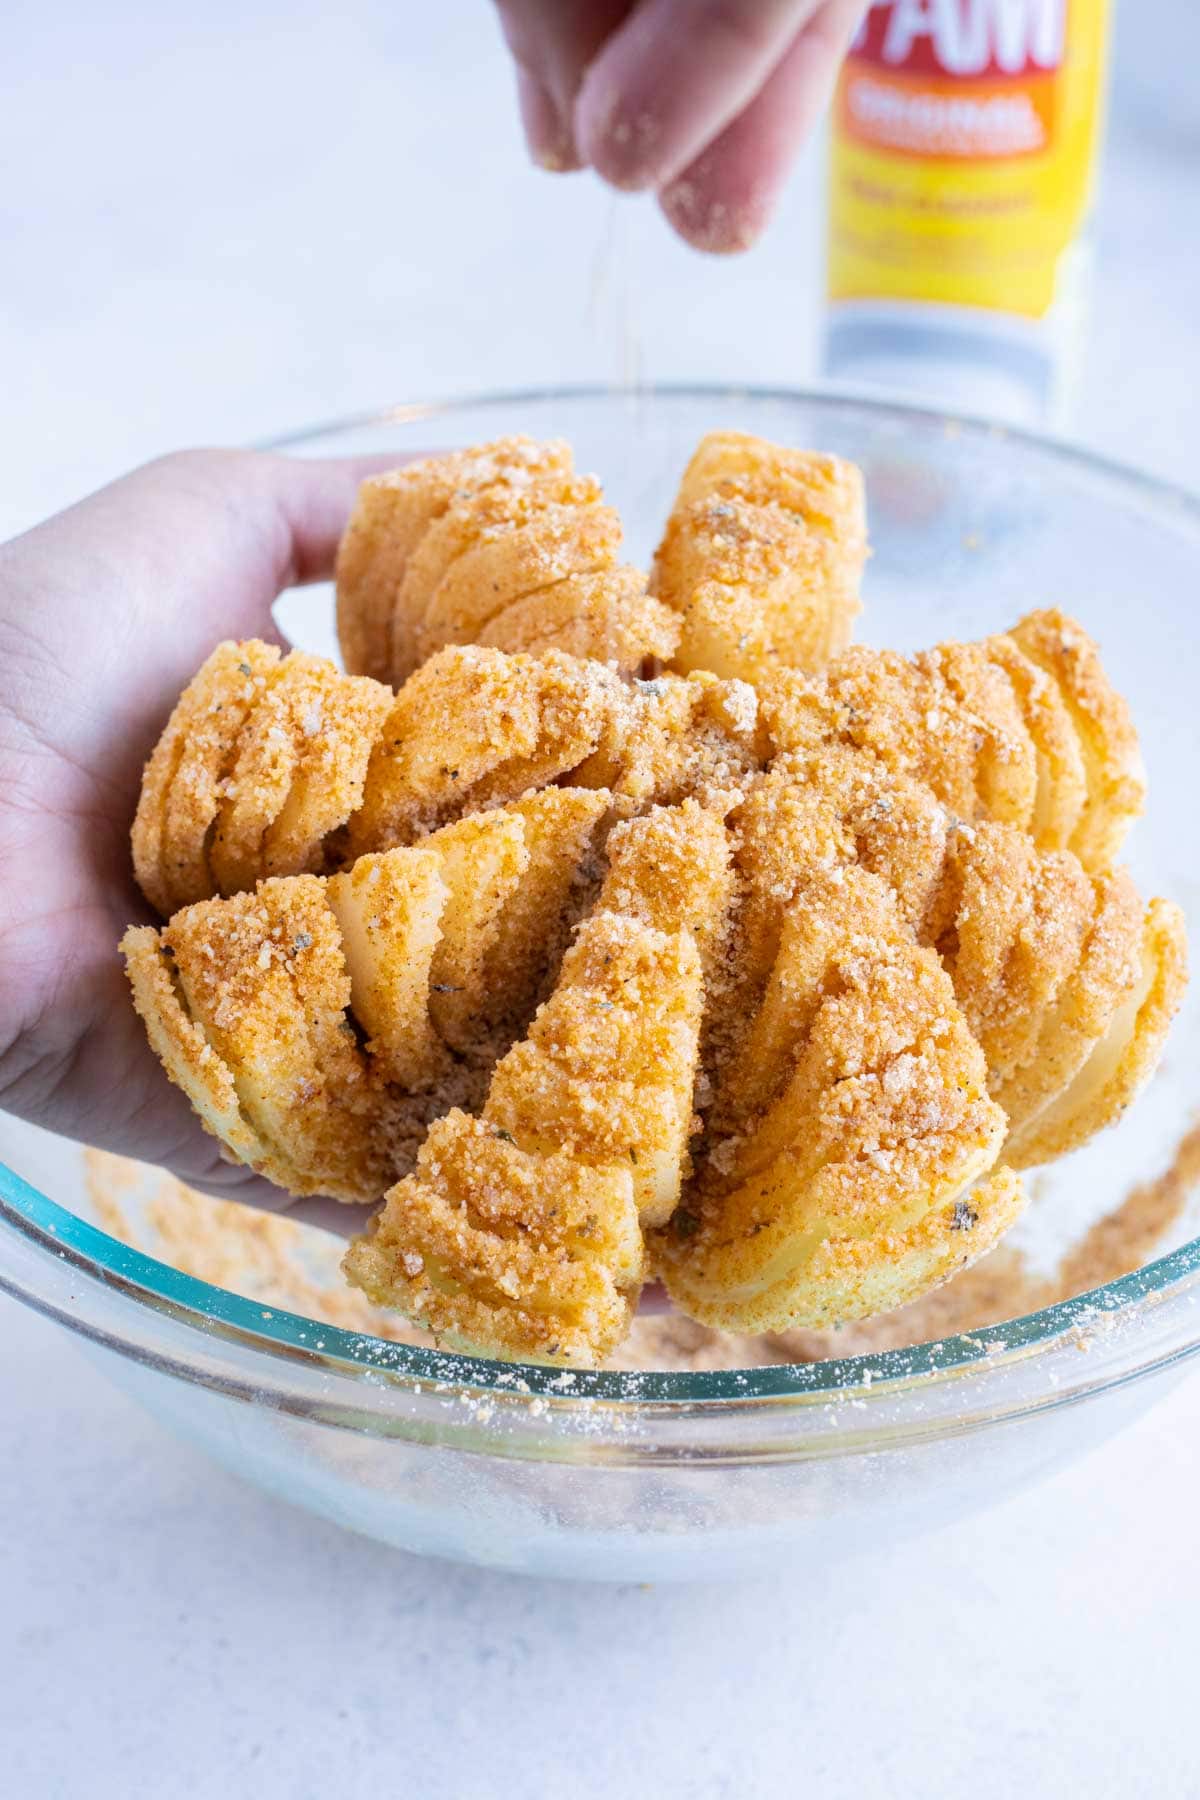
Coat the onion, both the outside and in-between the slices, with non-stick cooking spray. Give the onion a second coating with any of the flour mixture that fell to the bottom of the bowl.
Whisk the dry ingredients. Sprinkle coating onto the onion. Spray with non-stick cooking spray and continue coating.
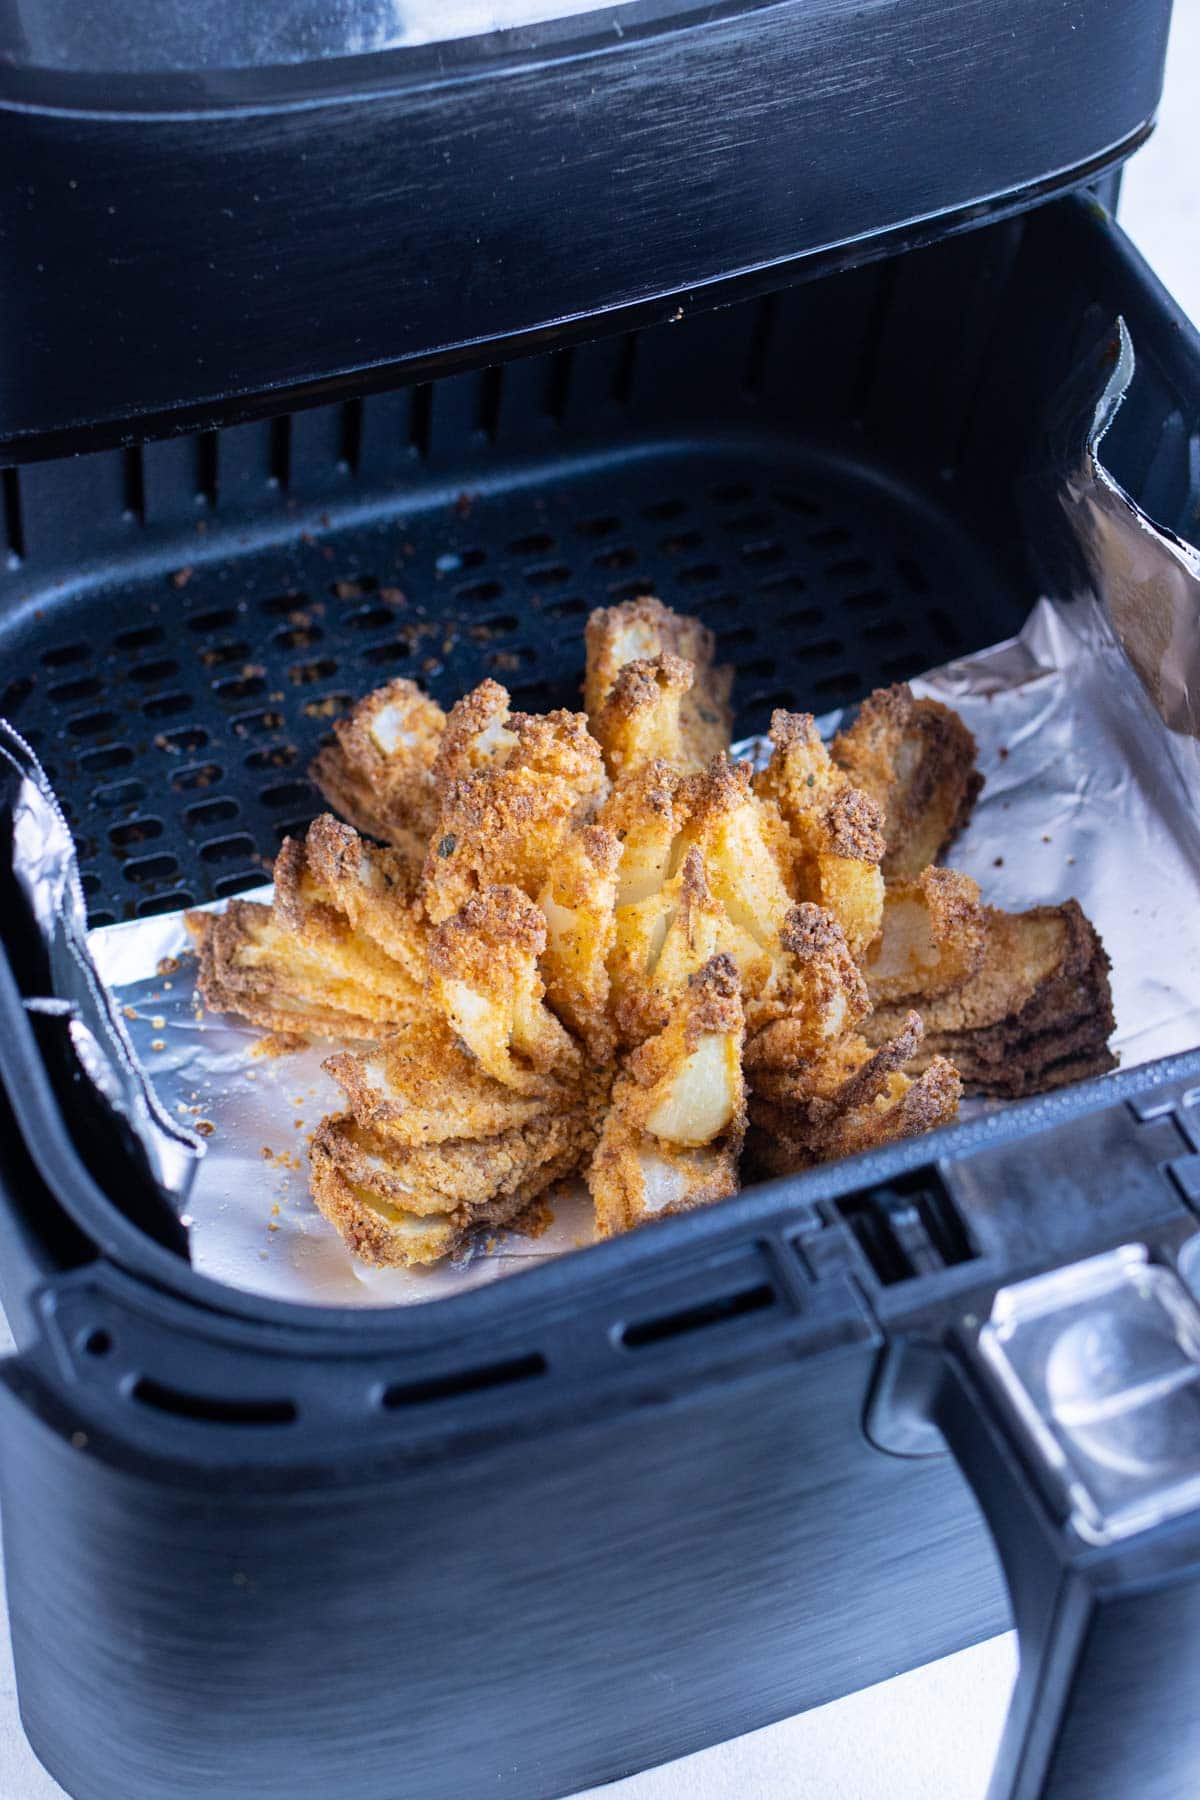
Cook in Air Fryer
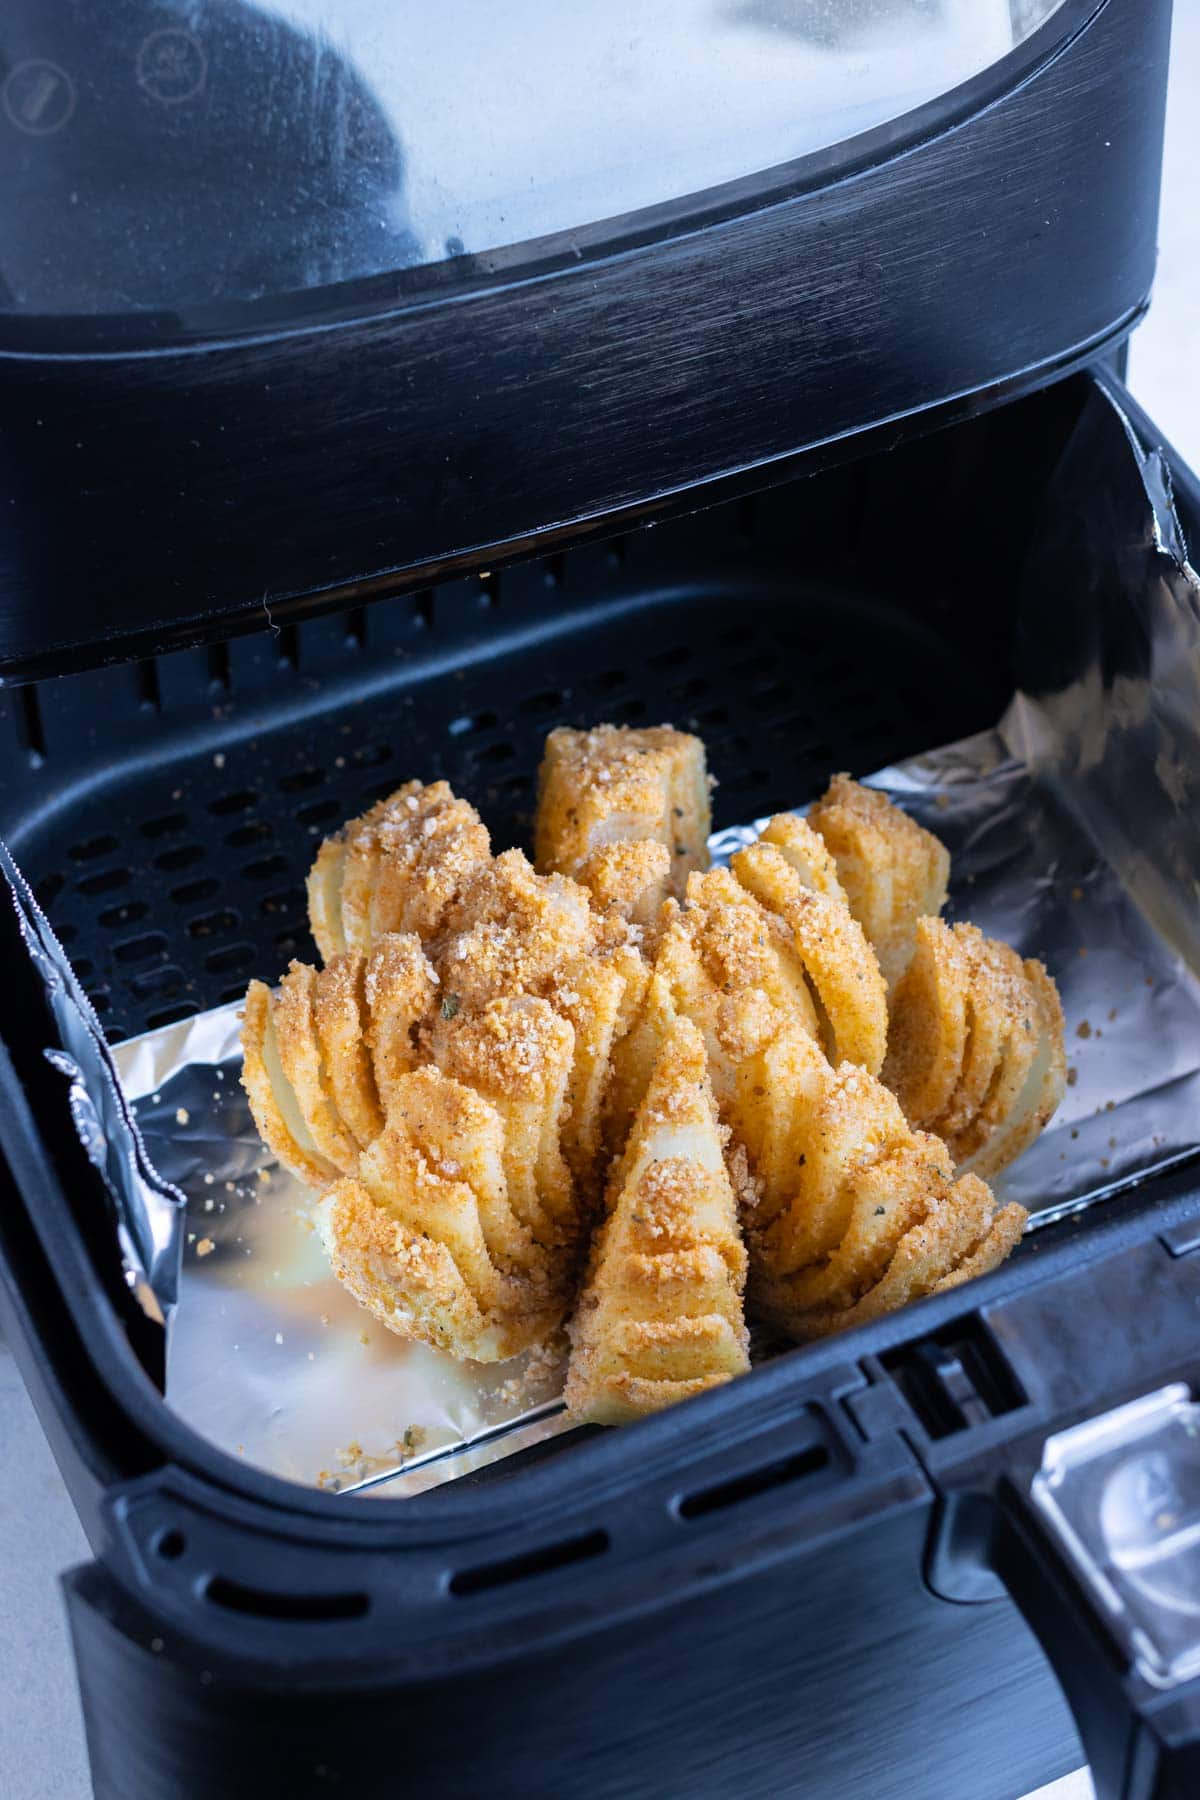
Fold a sheet of foil into a 3-inch thick and 15-inch long piece. Lay it in the bottom of the Air Fryer basket to help remove the onion once it’s cooked and tender.
Air Fryers are like ovens in that they should be preheated every time you use them. Set the Air Fryer to 350°F and let it run for 3 minutes before cooking.
Place the onion on top of the foil in the Air Fryer and then coat it liberally with non-stick cooking spray. It is critical to coat it in the spray so the edges turn golden brown and don’t burn.
Cook for 22-25 minutes. Turn the onion every 7-8 minutes and give another spritz of non-stick-cooking spray. Once the edges turn golden brown and the onion is tender, it’s done cooking.
Place in the air fryer. Cook until golden brown on edges.
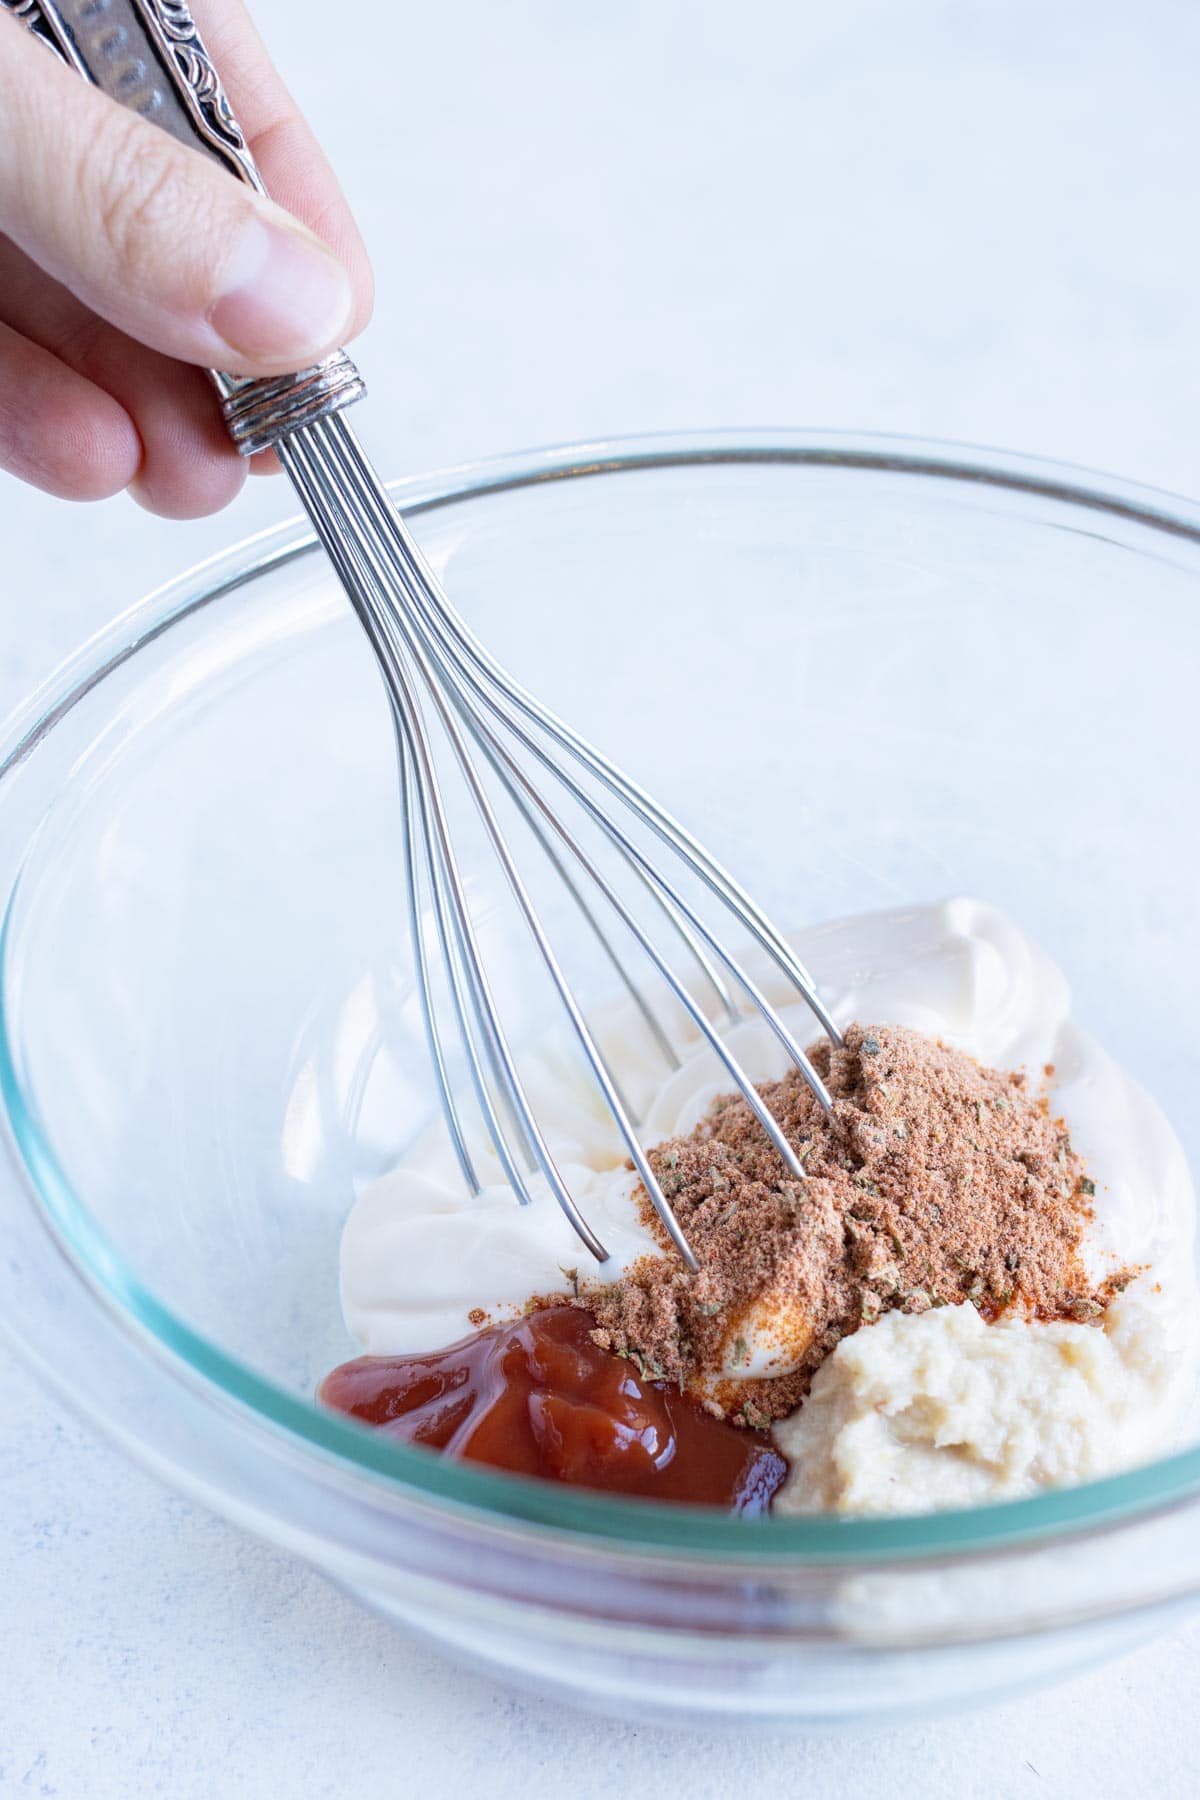
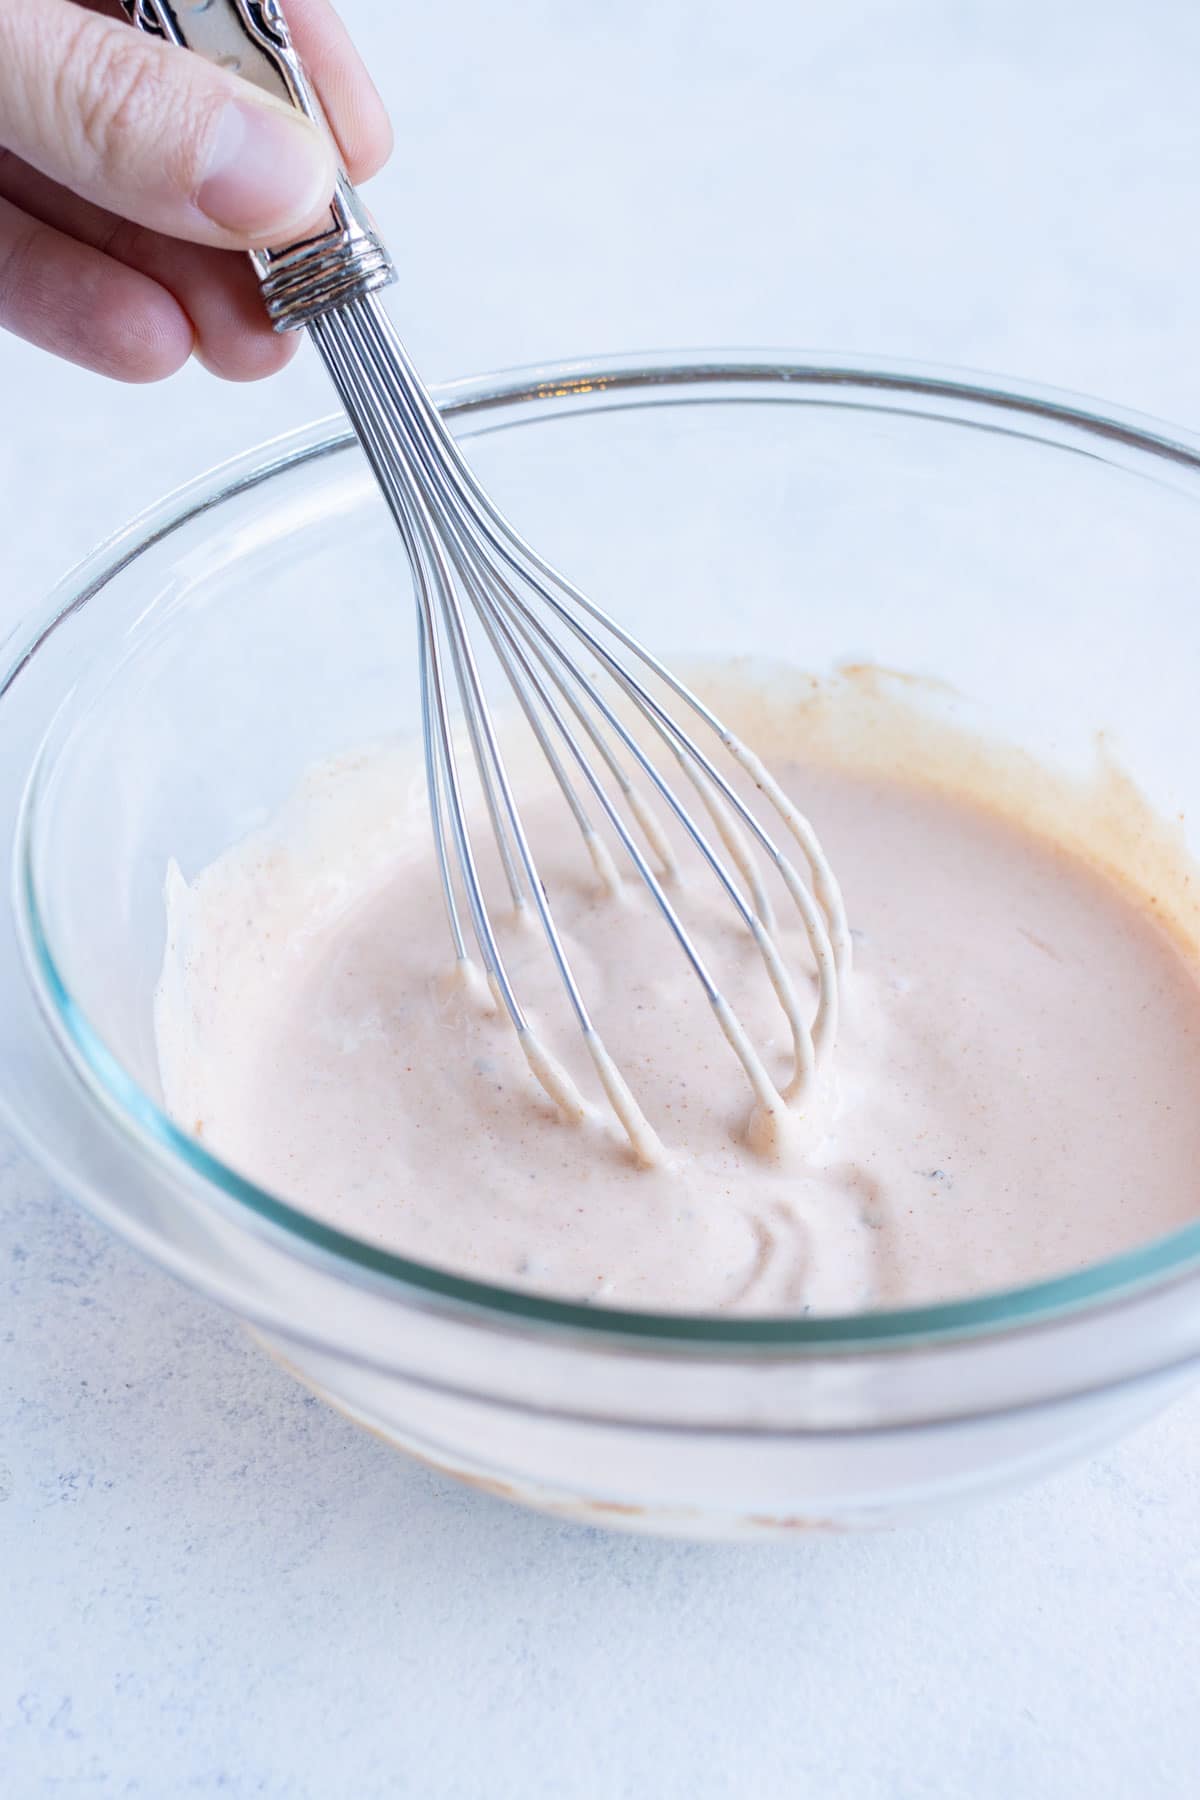
Whisk the Sauce
Stir together the mayonnaise, ketchup, horseradish, and seasoning ingredients in a medium-sized bowl with a whisk until smooth. Add horseradish until it satisfies your taste preferences.
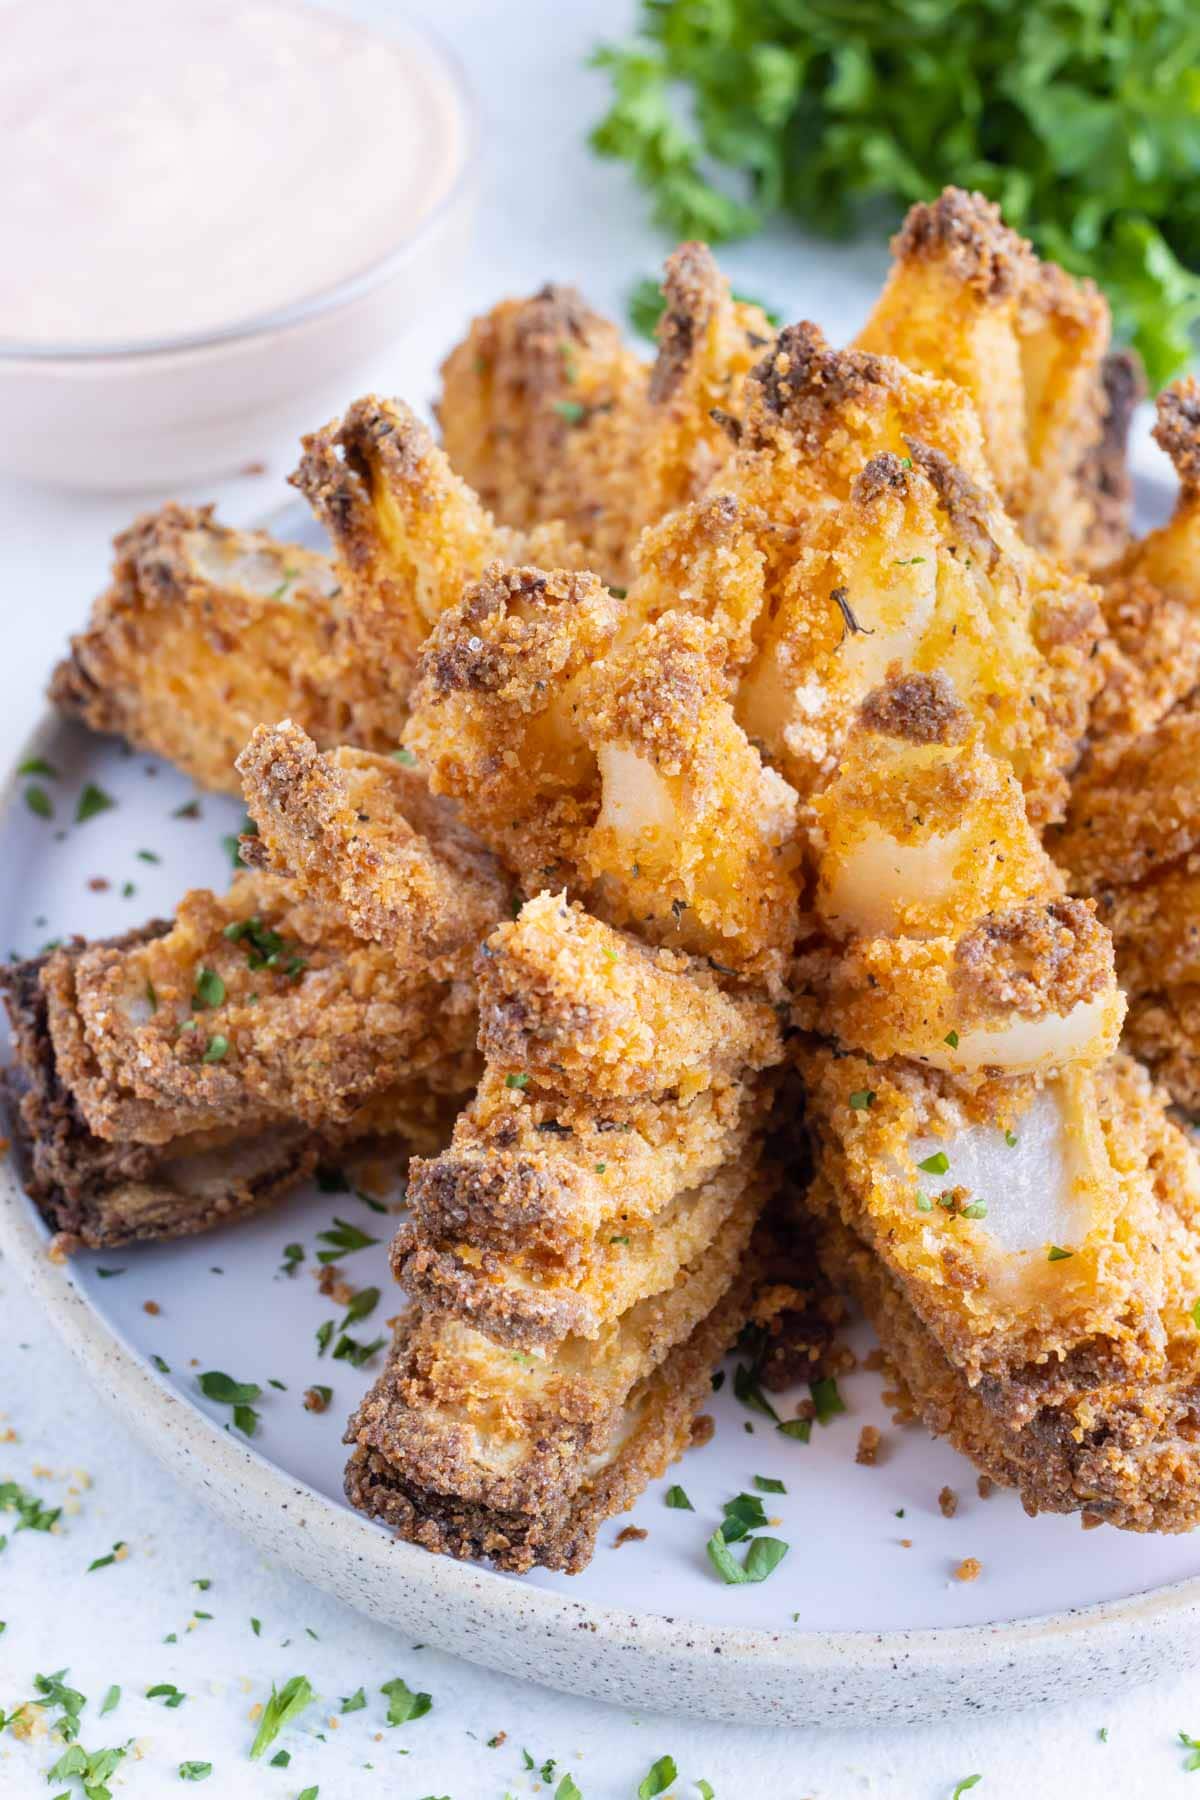
Garnish the blooming onion with a sprinkle of fresh parsley and pair with the dipping sauce. Enjoy!
Measure out ingredients. Mix until smooth.
Meal Prep and Storage
- To Prep-Ahead: Cut the onion and whisk the breadcrumb coating up to 2 days in advance.
- To Store: Keep leftovers in an airtight container in the refrigerator for up to 3-5 days.
- To Freeze: Seal in an airtight freezer-safe container for up to 3 months.
- To Reheat: This is best if served immediately as it does not reheat well. If you have to you can return to a 350°F air fryer until warmed through.
Dietary Modifications
The recipe you’ll find below is already vegetarian as written. Here are some adjustments and substitutions you can make to help it fit your other dietary requirements:
- Gluten-free – Select certified gluten-free breadcrumbs and flour.
- Low-carb – Find a low-carb flour and breadcrumbs.
- Vegan – Use a flax egg and plant-based milk.
FAQs
Spray the coated onion with cooking spray before air frying for the crispiest results.
The appetizer at Outback is high in calories and fat due to the deep fried batter. You can make a healthier version at home using a breadcrumb coating and cooking it in an Air Fryer.
Set the onion cut-side up and let it rest for 5 minutes to allow the petals to fall. You may need to make the cuts a little closer to the root if hasn’t opened after 5 minutes on its own.
Expert Tips and Tricks
- Don’t get too close. Leave at least ½-1 inch of onion around the root so the onion pieces don’t break off.
- Keep ’em thick. It is easier to handle the cut onion if you only make 8 cuts instead of 12. Thinner petals are more fragile and can break more easily.
- Pour it out. The spout on a measuring cup makes it easier to get the egg wash in-between the slices.
- Double coat. Coat the onion with non-stick cooking spray to add another layer of breadcrumb coating.
- Fold some foil. A piece of foil makes it easy to remove the cooked onion from the Air Fryer.
More Copycat Restaurant Favorites
Re-create the most delicious dishes at home with these easy recipes:
PF Chang’s Chicken Lettuce Wraps
Applebee’s Fiesta Lime Chicken
Tap stars to rate!
Air Fryer Blooming Onion Recipe
email this recipe!
Ingredients
Blooming Onion:
- 1 large sweet onion
- 2 large eggs large
- ½ cup milk regular or plant-based
- ½ cup plain breadcrumbs regular, gluten-free if needed
- ¼ cup flour all purpose or gluten-free
- ¾ tsp. garlic powder
- ¼ tsp. onion powder
- ½ tsp. paprika
- ½ tsp. oregano dried
- ⅛ cayenne pepper optional
- ¾ tsp. salt
- ¼ tsp. black pepper
Dipping Sauce:
- ½ cup mayo
- 1 Tbsp. ketchup
- 2-3 tsp. horseradish to taste
- ½ tsp. paprika
- ¼ tsp. garlic powder
- ¼ tsp. oregano dried
- Pinch of cayenne pepper
- ¼ tsp. salt
Instructions
Cutting the Onion:
- Cut and remove ½-1 inch from the stem end of the onion, keeping the root end intact. Peel the outer layer, completely removing the feathery skin.1 large sweet onion
- Place the onion flat-side down on a cutting board. Make a cut starting about ½-inch from the root end of the onion. Avoid cutting too close to the root so you don’t accidentally slice the onion in half! Also, be sure to cut all of the way into the middle of the onion so all of the cuts connect.
- Make three more slices even spaced so the onion is cut into quarters. Go back between the slices and make 1-2 additional cuts to get 8-12 sections.
- Turn the onion over and let it rest for 5 minutes so the pieces can naturally open up.
Coating the Blooming Onion:
- Whisk together the eggs and milk in a measuring cup.2 large eggs, ½ cup milk
- Place the cut onion into a large bowl and then carefully pour the egg/milk mixture over the onion. Be sure to separate the slices so the egg mixture gets in-between them. Remove the onion from the bowl and let any excess egg mixture drain off. Place the coated onion in a large bowl, cut side-up.
- Toss together the breadcrumbs, flour, garlic powder, onion powder, paprika, oregano, cayenne pepper, salt, and black pepper in a medium-sized bowl.½ cup plain breadcrumbs, ¼ cup flour, ¾ tsp. garlic powder, ¼ tsp. onion powder, ½ tsp. paprika, ⅛ cayenne pepper, ¾ tsp. salt, ¼ tsp. black pepper
- Sprinkle the flour and breadcrumb mixture over all of the cut onion, making sure to spread it apart to get in-between the slices and to coat the exterior of the onion. Pick up the onion and shake off any excess coating.
- Spray the onion with non-stick cooking spray, getting between all of the slices. Re-use any of the breadcrumb mixture that fell to the bottom of the bowl to give the onion a second coating.
Air Frying the Blooming Onion:
- Add a folded up 3-inch thick and 15-inch long piece of aluminum foil into the base of the Air Fryer basket.
- Preheat the Air Fryer to 350 degrees for 3 minutes.
- Carefully place the onion into the Air Fryer and then coat it liberally with non-stick cooking spray.
- Air Fry for 22-25 minutes, turning every 7-8 minutes and spritzing again with non-stick-cooking spray. The blooming onion is done once the edges turn golden brown and the onion is tender.
- While the onion is air frying, whisk together the sauce in a medium-sized bowl until smooth. Add as much horseradish as desired.¾ tsp. garlic powder, ½ tsp. oregano, ½ cup mayo, 1 Tbsp. ketchup, 2-3 tsp. horseradish, ½ tsp. paprika, ¼ tsp. garlic powder, Pinch of cayenne pepper, ¼ tsp. salt, ¼ tsp. oregano
- Serve the blooming onion with a sprinkle of fresh parsley and the dipping sauce. Enjoy!
Tap stars to rate!
Notes
- To Store: Keep leftovers in an airtight container in the refrigerator for up to 3-5 days.
- To Freeze: Seal in an airtight freezer-safe container for up to 3 months.
Nutrition
Nutrition information is automatically calculated, so should only be used as an approximation.


My first stab at this and it came out pretty good… I could not get the egg/milk mixture to stick to the onion hence the dry mixture did not stick well… I ended up mixing the liquid and the dry and it worked better… On my next attempt I think I will make more of a batter with the liquid/dry and dip the onion into it…. It was pretty tasty though….